How to Make Pegasus Drawing Step By Step Tutorial

james robert


The winged pony Pegasus is one of Greek folklore’s most famous and conspicuous figures. She includes numerous accounts from this old folklore. She stays famous today, showing up in various television series, movies, comics, and computer games, to give some examples. It’s not difficult to see why, as who doesn’t want to ride a flying winged horse? This may not be plausible, so figuring out how to draw Pegasus is the best! Pegasus Drawing & Athena drawing or other drawing ideas for every drawing lover.
If you love this exemplary animal, you will track down a great deal to cherish in this instructional exercise. We want to believe that you partake in this guide on the most proficient method to draw Pegasus that we have arranged for you!
There is no doubt; drawing ponies is a test in ideal circumstances. You don’t have to stress, be that as it may. However long you follow this aid and take it gradually, you will figure out how to make it happen!
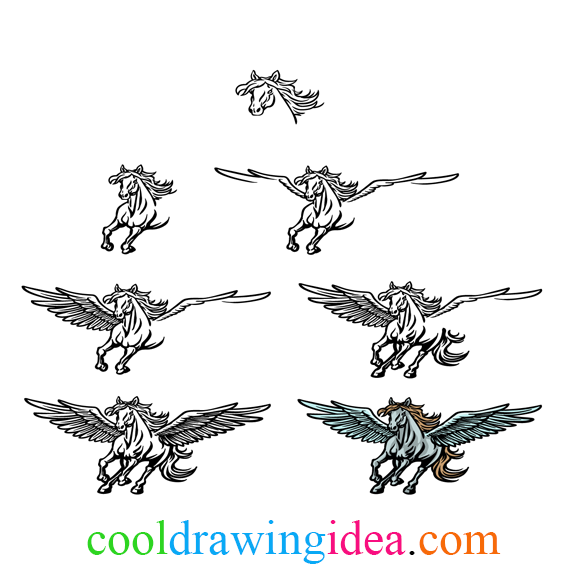
Until further notice, how about we start with the face of Pegasus? Make an honest effort to duplicate our reference picture admirably well and incorporate the line subtleties that we flaunt. Remember to add a few subtleties, like the eyes and nostrils! When the face is drawn, we can polish it off by removing Pegasus’s streaming hair and mane. We can continue toward stage 2.
Now that the head and mane are finished, we can add the legs and body for your Pegasus drawing. In the first place, define a few bent boundaries going down the middle and sides of the neck similarly that they show up in the reference picture.
Then, at that point, you can begin to draw the legs. Which is where it can get precarious. Utilize a few adjusted lines for the front shoulders of the body. Draw the meager legs descending from them and adapt to show that she is in a running position. It’s just as simple as this step, and it’s the ideal opportunity for stage 3!
Visit www.cooldrawingidea.com for the latest drawing tutorial.
Without her unique wings, Pegasus would essentially be a standard pony, and we don’t need that for this drawing! Consequently, we will add a few wings for her in this step of our aid on the most proficient method to draw Pegasus.
Utilize a few bent lines to begin the framework that starts at her shoulders and stretches far to the sides. These diagrams will bend internally to give the presence of enormous quills. And our reference picture will show you what we mean by this. We will polish off these wings soon in the following couple of steps.
We will add a few significant quills to the wing on the left for this piece of your Pegasus drawing. Forging ahead from what you began in the past step, you can draw two layers of these plumes. Each quill will be extended with straight edges and sharp finishes. Each plume will likewise have a line drawn through the middle.
We will not be adding plumes to the next wing presently. However, we will polish that wing off in a future step.
You’re prepared to polish off the last legs and body subtleties in this step of our aide on the most proficient method to draw Pegasus. The back legs will look longer and straighter than the initial ones, which will underscore that Pegasus is in a running position for this image.
Likewise, draw the thick hip muscles at the highest point of the leg. We will again be adding a concealing subtlety to the base. Whenever you have completed the process of drawing and specifying these legs. Polish off this step by defining a few wavy boundaries for the tail streaming behind her. Once these are completely drawn, we can polish off the last contacts in the following stage.
This piece of your Pegasus drawing will be tied to completing the last subtleties before you variety her in. To do this, we will attract a few plumes for the second wing, similar to what you accomplished for the absolute first wing. That implies adding two additional layers of long quills and a piece sharp at the finishes. Remember to likewise add a few lines to the focal point of each quill!
When the wing is finished, you can likewise add your very own few subtleties! You could attract a foundation to make Greek folklore feel or add a few additional exemplary divine beings and animals. How might you polish off this Pegasus drawing?
Pegasus is much of the time portrayed as unadulterated white, yet there are different understandings too. We went for one of these understandings in our model picture for this last step of our aid on the most proficient method to draw Pegasus. We utilized grays, blues, and browns for the different pieces of Pegasus. Yet you could use any varieties you like!
When you realize the variety of conspiring you might want to use for her, make sure to have a good time exploring different avenues regarding artistry mediums and instruments to polish you’re drawing off.

All Rights Reserved © 2023