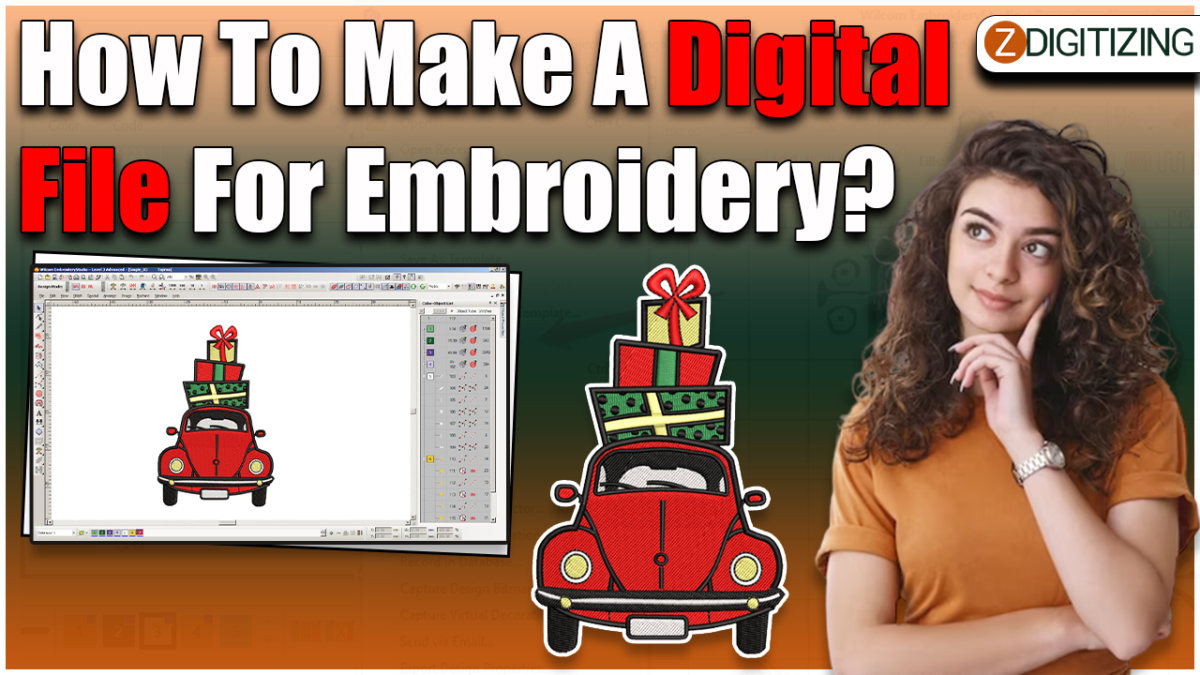
Embroidery, a craft that beautifully translates digital designs into tactile art, hinges on the creation of an impeccable digital file. Whether you’re a seasoned embroiderer or a novice venturing into the world of stitched creations, understanding how to make a digital file for embroidery is a fundamental skill. In this comprehensive guide, we unravel the intricacies of the digital embroidery process, providing step-by-step insights, tips, and techniques to ensure your digital files are not just stitches but a testament to your creative vision.
The Basics: Understanding Digital Embroidery Files
1. File Formats for Embroidery
Embroidery Machine Compatibility:
- Digital files for embroidery come in specific formats recognized by embroidery machines.
- Common formats include DST, EXP, PES, and VP3, each compatible with various machine brands.
Vector Graphics for Precision:
- Vector graphic formats, such as SVG or AI, are ideal for creating embroidery designs.
- These formats ensure scalability without compromising the quality of the design.
Essential Tools and Software
2. Embroidery Design Software
Dedicated Embroidery Software:
- Invest in dedicated embroidery design software for comprehensive design creation.
- Software like Wilcom, Hatch, or Embrilliance provides advanced features for designing intricate embroidery patterns.
Vector Graphics Software:
- Utilize vector graphics software like Adobe Illustrator or CorelDRAW for initial design creation.
- These programs enable precise control over shapes, lines, and colors before converting the design into an embroidery file.
Step-by-Step Guide to Creating a Digital Embroidery File
3. Design Conceptualization
Sketching or Digital Rendering:
- Begin with a concept sketch or a digital rendering of your embroidery design.
- Outline the shapes, colors, and details to serve as a blueprint for the digital file.
Consideration for Stitch Types:
- Plan the types of stitches to be used in different parts of the design.
- Different stitch types, such as satin stitches for smooth surfaces and fill stitches for broader areas, contribute to the overall texture and visual appeal.
4. Vector Design Creation
Import Sketch into Vector Software:
- Import your sketch into vector graphics software for precise design creation.
- Use tools like the pen tool, shapes, and layers to recreate the design with clean lines and accurate proportions.
Color Palette Selection:
- Choose a color palette that complements your design.
- Assign colors to different elements, keeping in mind the thread colors you’ll use during the embroidery digitizing services process.
5. Conversion to Embroidery Format
Export as Vector Format:
- Export the vector design in a format compatible with your embroidery software.
- Save the file as SVG or AI to retain the vector properties.
Import into Embroidery Software:
- Open the exported vector file in your embroidery design software.
- Adjust settings such as stitch density, underlay, and pull compensation based on the specific requirements of your design.
6. Digitizing the Design
Digitize Individual Elements:
- Digitize each element of the design by assigning stitches to different areas.
- Define stitch types, stitch directions, and stitch lengths to capture the nuances of your design accurately.
Consideration for Text:
- If your design includes text, pay special attention to the digitization of letters.
- Adjust spacing and density to ensure legibility and aesthetic harmony.
7. Preview and Adjustments
Preview Stitch Sequence:
- Use the preview feature in your embroidery software to visualize the stitch sequence.
- This step allows you to identify any areas that may need adjustments before the actual embroidery process.
Fine-Tune Stitch Settings:
- Fine-tune stitch settings to achieve the desired outcome.
- Experiment with different stitch angles or densities to enhance the texture and appearance of the design.
Advanced Techniques for Digital Embroidery Mastery
8. Layering and Blending Techniques
Creating Depth with Layers:
- Experiment with layering techniques to add depth to your embroidery design.
- Layers can simulate shadows, highlights, and intricate details, contributing to a more realistic and visually appealing result.
Blending Thread Colors:
- Master the art of blending thread colors to create seamless transitions.
- Gradual shifts in thread colors can emulate gradients and enhance the overall visual impact of the design.
9. Incorporating Texture and Effects
Texture Emulation with Stitches:
- Use stitches strategically to emulate texture in your design.
- Techniques like using short stitches for fur or long stitches for flowing fabric can add a tactile quality to the embroidery.
Specialty Stitches and Effects:
- Explore specialty stitches and effects offered by advanced embroidery software.
- These can include 3D stitches, appliqué effects, or intricate patterns that elevate your design beyond the ordinary.
Common Challenges and Solutions
10. Addressing Stitch Distortion and Density Issues
Density Adjustment:
- If experiencing distortion or puckering, adjust the stitch density.
- Experiment with lower or higher density settings based on the fabric and design intricacy.
Understanding Fabric Characteristics:
- Different fabrics react differently to embroidery stitches.
- Consider the characteristics of the fabric you’ll be using and make adjustments to accommodate its stretch, density, and texture.
Conclusion: Your Embroidery Design, Your Masterpiece
Creating a digital file for embroidery is a journey that requires a blend of creativity, technical skill, and a keen eye for detail. From conceptualization to digitization and fine-tuning, each step contributes to the transformation of your vision into a stitched masterpiece.
As you embark on your digital embroidery journey, remember that experimentation is key. Embrace the process of trial and error, learn from each design iteration, and celebrate the unique qualities that make your embroidery creations a reflection of your artistic expression.
Zdigitizing
ZDigitizing is offering a wide range of digitizing solutions to meet the needs of vector artwork services businesses and individuals alike. With expertise in logo digitizing, 3D puff digitizing, cap digitizing, and applique digitizing, zdigitizing ensures high-quality and precise embroidery designs.
Their team of skilled embroidery digitizer is well-versed in converting images to embroidery digitizing, making it easy to transform your logos, artwork, or designs into stitch files. Whether you have a PNG or JPG image, ZDigitizing can seamlessly convert it into embroidery-ready files, ensuring accurate reproduction of intricate details and vibrant colors.
ZDigitizing prides itself on delivering quick turnaround times without compromising on quality. They employ state-of-the-art software and machinery to create flawless embroidery designs that bring your vision to life. Their commitment to customer satisfaction, attention to detail, and competitive pricing sets them apart in the embroidery digitizing industry.