How to Improve Your Exterior Architectural Rendering to Impress Your Clients

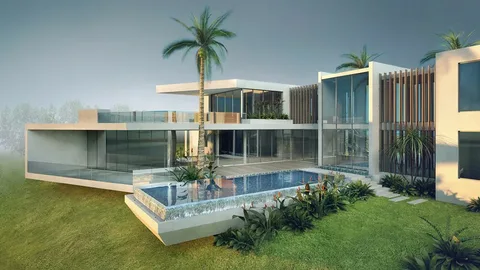
Before construction begins, your client will be able to see what your building project will look like from the outside. This results in lower costs, more investors, and happier customers.
BluEntCAD will show you how to improve the quality and clarity of your 3D exterior Architectural renderings in this article.
Introduction
While blueprints have been around for a long time, 3D architectural rendering provides a much clearer, more detailed picture of how a finished structure will look.
Realistic architectural rendering is extremely useful in this regard because it allows for the creation of a replica of the structure under construction using various models. Of course, it is only one of many architectural rendering styles.
What is 3D Exterior Rendering?
3D rendering, in its broadest sense, refers to the visualization and creation of images and models using 3D software. Photorealistic architectural renderings are used to provide clients with an accurate representation of the proposed structure.
This aids in decision-making and detecting flaws earlier in the process, thereby avoiding the costs of correcting mistakes after the fact. As a result, architectural rendering studios have become increasingly popular.
For photorealistic rendering, several architectural rendering software and tools are available. 3DS Max and VRay are two examples.
We’ll show you how to use architectural rendering techniques to make your renders more appealing to clients and potential investors. (See this page for examples of exterior rendering.)
Tips to Improve Your Exterior Architectural Rendering
Position of the Sun and the Shadows
The realism of the rendering is partially determined by the position and amount of sunlight. If it is not properly positioned, the rendering may appear overexposed or underexposed. Furthermore, the position of the sun helps to balance temperature variations and provides a sense of season.
Similarly, the position of the shadows affects the realism of the image. It is important to note that creating a realistic shadow is not the same as creating any other kind of shadow. Also, keep in mind that shadows should be create in Photoshop rather than 3D.
There are plugins available to assist you with these settings, such as SketchUp Pro’s solar north plugin. You can also use Autodesk’s Sunlight and Daylight Systems, as well as Blender’s Sun Position add-on.
Sky
Including a sky in your scene is essential for creating a realistic exterior architectural rendering.
If you have Photoshop skills, you can alter the scene’s original sky. If done correctly, the post-processed sky can add realism.
Podium Browser Cloud Domes can be use to supplement the Podium Physical Sky option.
Keep the following tips in mind when creating a sky:
Color that is oversaturated should be avoid. This dominates the rest of the render, including the most important element, the building.
Don’t overcrowd the sky with clouds or other objects. This, once again, dominates the rest of the render.
There’s nothing wrong with keeping things simple. Sometimes a gradient is all that is require to create the desir atmosphere.
Detailing
Don’t expect your client to overlook missing details.
Road curbs, drainage pipes, height variations, and vegetation can all be add to your rendering. Human figures should be avoided in exterior 3D renderings, or shown inside the building if necessary.
Reflection
Mirrored surfaces and glass are the most difficult to realistically render. It is necessary to strike a delicate balance. If it’s too perfect, your client might think it’s deceptive.
A reflection will be require for any glass structure in the rendering. For glass and water materials, we recommend Podium Browser.
You can enhance the impact by using panoramic backgrounds. If the glass has no reflections, you may need to add a few more images behind the camera.
Camera Height
If you choose a camera view, you must take some precautions.
For example, the camera is frequently kept at eye level to enhance the realism of the scene. To be more specific, your camera should be 50-70 cm above the ground or high enough to capture a helicopter or drone shot.
Aside from that, keeping focal points in mind and adhering to the rule of thirds can be beneficial.
Conclusion
Your exterior architectural rendering will become more realistic once you learn to apply these concepts.
If you still need assistance, BluEntCAD, an architectural rendering company, is only a click away. We offer 3D rendering services to homebuilders, large architectural and engineering firms, real estate development firms, interior design firms, and home design firms.
Are you ready to take your company to the next level with architectural rendering services? Please contact us right away!


